


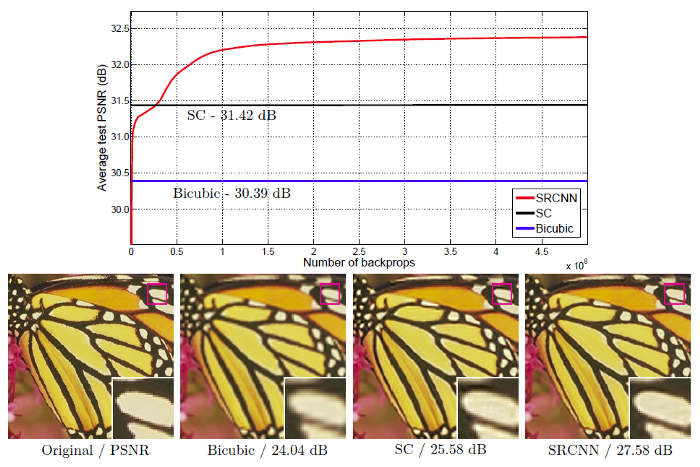
Enhance image resolution using deep learning — recover crisp high-resolution details from low-resolution inputs.
- 🔍 Using the Super-Resolution Convolutional Neural Network for Image Restoration
Single-Image Super-Resolution (SR) is a fundamental task in image processing and computer vision that focuses on reconstructing a high-resolution (HR) image from a single low-resolution (LR) input. Unlike traditional upscaling methods that simply interpolate pixel values, super-resolution techniques aim to recover fine details, textures, and sharp edges that were lost during the downsampling process.
This technology has transformative real-world applications:
| Domain | Application |
|---|---|
| 🎥 Surveillance | Enhancing grainy security camera footage to identify critical details |
| 🏥 Medical Imaging | Improving the clarity of MRI, CT, and X-ray scans for better diagnosis |
| 🎮 Gaming & Media | Upscaling legacy video content and retro games to modern resolutions |
| 📸 Photography | Restoring old, low-quality photographs and enlarging images without losing quality |
| 🛰️ Remote Sensing | Enhancing satellite imagery for geographic and environmental analysis |
The Super-Resolution Convolutional Neural Network (SRCNN), introduced by Dong et al. (2014), was a groundbreaking milestone as one of the first successful applications of deep learning to single-image super-resolution. It demonstrated that a fully convolutional neural network could learn an end-to-end mapping between low- and high-resolution images, outperforming traditional sparse-coding-based methods by a significant margin.
💡 Fun Fact: The "enhance" button you see in crime dramas? While exaggerated, SRCNN and its modern successors (EDSR, ESRGAN, Real-ESRGAN) bring us remarkably close to that reality!
- ✅ End-to-End Deep Learning — Learns the LR→HR mapping directly from data without hand-crafted features
- ✅ Lightweight Architecture — Only 3 convolutional layers, making it fast and easy to understand
- ✅ Objective Evaluation — Quantitative assessment using PSNR, MSE, and SSIM metrics
- ✅ Pre-trained Weights — Skip training from scratch; load weights and super-resolve immediately
- ✅ OpenCV Integration — Complete image processing pipeline with color space conversions (RGB ↔ BGR ↔ YCrCb)
- ✅ Jupyter Notebook Included — Interactive, step-by-step walkthrough for easy experimentation
- ✅ 18 Standard Test Images — Benchmark results on classic Set5 and Set14 datasets
| Technology | Purpose |
|---|---|
| Python 3.x | Core programming language |
| Keras (with TensorFlow backend) | Deep learning framework for building and deploying the SRCNN |
| OpenCV | Image I/O, resizing, and color space conversions |
| NumPy | Numerical computations and array operations |
| Matplotlib | Visualization of original, degraded, and super-resolved images |
| scikit-image | SSIM computation and image quality analysis |
- Python 3.6+
- pip or conda package manager
# 1. Clone the repository
git clone https://github.com/your-username/AI-UltraVision.git
cd AI-UltraVision

# 2. (Recommended) Create a virtual environment
python -m venv venv
source venv/bin/activate        # On Linux/macOS
# OR
venv\Scripts\activate           # On Windows

# 3. Install dependencies
pip install keras tensorflow opencv-python numpy matplotlib scikit-imageimport sys
import keras
import cv2
import numpy
import matplotlib
import skimage
print(f"Python: {sys.version}")
print(f"Keras: {keras.__version__}")
print(f"OpenCV: {cv2.__version__}")
print(f"NumPy: {numpy.__version__}")
print(f"Matplotlib: {matplotlib.__version__}")
print(f"Scikit-Image:{skimage.__version__}")AI-UltraVision/
│
├── 📁 results/ # Sample output images (Set5 + Set14 benchmarks)
│ ├── baboon.png
│ ├── baby_GT.png
│ ├── barbara.png
│ ├── bird_GT.png
│ ├── butterfly_GT.png
│ ├── coastguard.png
│ ├── comic.png
│ ├── face.png
│ ├── flowers.png
│ ├── foreman.png
│ ├── head_GT.png
│ ├── lenna.png
│ ├── monarch.png
│ ├── pepper.png
│ ├── ppt3.png
│ ├── woman_GT.png
│ └── zebra.png
│
├── 📓 Image Super Resolution with the SRCNN (Jupyter Notebook).ipynb
│ └── Interactive notebook with full implementation
│
├── 📄 README.md # You are here! ⭐
└── 📄 LICENSE # MIT License
Note: To run the notebook end-to-end, you will also need:
- A
source/folder containing the original HR images (Set5 / Set14)- An
images/folder for the artificially degraded (bicubic downscaled) images- An
output/folder where super-resolved results will be saved- The pre-trained weights file:
3051crop_weight_200.h5Download the pre-trained weights from the SRCNN-Keras repository.
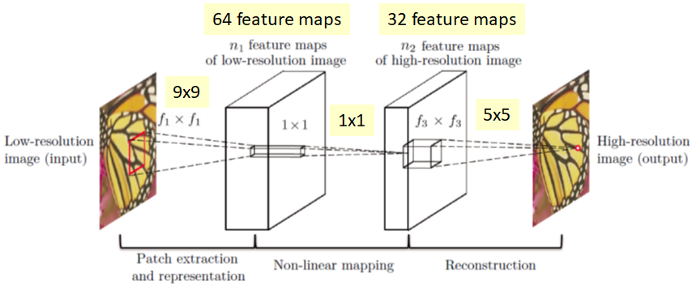
The SRCNN is elegantly simple, consisting of only three convolutional layers, each serving a distinct purpose:
| Layer | Filters | Kernel Size | Padding | Activation | Purpose |
|---|---|---|---|---|---|
| Patch Extraction & Representation | 128 | 9 × 9 | valid | ReLU | Extracts overlapping patches from the LR image and represents each patch as a high-dimensional feature vector |
| Non-linear Mapping | 64 | 3 × 3 | same | ReLU | Maps the LR feature vectors to HR feature vectors via a non-linear transformation |
| Reconstruction | 1 | 5 × 5 | valid | linear | Aggregates the HR predictions to produce the final super-resolved image |
Training Details:
- Loss Function: Mean Squared Error (MSE)
- Optimizer: Adam (learning rate = 0.0003)
- Input: Luminance (Y) channel in YCrCb color space
- Output: Reconstructed Y channel, merged back with upscaled Cr/Cb channels
import sys
import os
import math
import numpy as np
import cv2
import matplotlib.pyplot as plt

from keras.models import Sequential
from keras.layers import Conv2D
from keras.optimizers import Adam
from skimage.measure import compare_ssim as ssim

%matplotlib inlineDefine functions to objectively evaluate reconstruction quality:
def psnr(target, ref):
    """Calculate Peak Signal-to-Noise Ratio (PSNR)."""
    target_data = target.astype(float)
    ref_data = ref.astype(float)
    diff = ref_data - target_data
    diff = diff.flatten('C')
    rmse = math.sqrt(np.mean(diff ** 2.))
    return 20 * math.log10(255. / rmse)


def mse(target, ref):
    """Calculate Mean Squared Error (MSE)."""
    err = np.sum((target.astype('float') - ref.astype('float')) ** 2)
    err /= float(target.shape[0] * target.shape[1])
    return err


def compare_images(target, ref):
    """Compute PSNR, MSE, and SSIM in one call."""
    scores = [
        psnr(target, ref),
        mse(target, ref),
        ssim(target, ref, multichannel=True)
    ]
return scoresGenerate low-resolution versions by bicubic downscaling and upscaling:
def prepare_images(path, factor):
    """Create degraded images by downscaling and upscaling."""
    for file in os.listdir(path):
        img = cv2.imread(os.path.join(path, file))
        h, w, _ = img.shape

        # Downscale
        img = cv2.resize(img, (w // factor, h // factor),
                         interpolation=cv2.INTER_LINEAR)
        # Upscale back
        img = cv2.resize(img, (w, h),
                         interpolation=cv2.INTER_LINEAR)

        cv2.imwrite(f'images/{file}', img)
        print(f'Saving {file}')

# Generate 2× degraded images
prepare_images('source/', factor=2)def build_srcnn():
"""Define the SRCNN architecture in Keras."""
model = Sequential()
model.add(Conv2D(filters=128, kernel_size=(9, 9),
kernel_initializer='glorot_uniform',
activation='relu', padding='valid',
use_bias=True, input_shape=(None, None, 1)))
model.add(Conv2D(filters=64, kernel_size=(3, 3),
kernel_initializer='glorot_uniform',
activation='relu', padding='same',
use_bias=True))
model.add(Conv2D(filters=1, kernel_size=(5, 5),
kernel_initializer='glorot_uniform',
activation='linear', padding='valid',
use_bias=True))
adam = Adam(lr=0.0003)
model.compile(optimizer=adam, loss='mean_squared_error',
metrics=['mean_squared_error'])
return modeldef modcrop(img, scale):
"""Crop image so dimensions are divisible by scale."""
sz = img.shape[:2]
sz = sz - np.mod(sz, scale)
return img[:sz[0], :sz[1]]
def shave(image, border):
"""Remove border pixels (to account for SRCNN's valid convolutions)."""
return image[border:-border, border:-border]
def predict(image_path, weights_path='3051crop_weight_200.h5'):
"""Run super-resolution on a single image."""
srcnn = build_srcnn()
srcnn.load_weights(weights_path)
path, file = os.path.split(image_path)
degraded = cv2.imread(image_path)
ref = cv2.imread(f'source/{file}')
ref = modcrop(ref, 3)
degraded = modcrop(degraded, 3)
# Convert to YCrCb and extract Y channel
temp = cv2.cvtColor(degraded, cv2.COLOR_BGR2YCrCb)
Y = np.zeros((1, temp.shape[0], temp.shape[1], 1), dtype=float)
Y[0, :, :, 0] = temp[:, :, 0].astype(float) / 255.
# Predict
pre = srcnn.predict(Y, batch_size=1)
pre *= 255.
pre = np.clip(pre, 0, 255).astype(np.uint8)
# Reconstruct BGR image
temp = shave(temp, 6)
temp[:, :, 0] = pre[0, :, :, 0]
output = cv2.cvtColor(temp, cv2.COLOR_YCrCb2BGR)
# Crop reference and degraded for fair comparison
ref = shave(ref.astype(np.uint8), 6)
degraded = shave(degraded.astype(np.uint8), 6)
# Evaluate
scores = [
compare_images(degraded, ref),
compare_images(output, ref)
]
return ref, degraded, output, scores
# Example: super-resolve one image
ref, degraded, output, scores = predict('images/flowers.bmp')
print("Degraded Image:")
print(f" PSNR: {scores[0][0]:.2f} dB")
print(f" MSE: {scores[0][1]:.2f}")
print(f" SSIM: {scores[0][2]:.4f}\n")
print("SRCNN Reconstructed Image:")
print(f" PSNR: {scores[1][0]:.2f} dB")
print(f" MSE: {scores[1][1]:.2f}")
print(f" SSIM: {scores[1][2]:.4f}")
# Visualize
fig, axes = plt.subplots(1, 3, figsize=(20, 8))
axes[0].imshow(cv2.cvtColor(ref, cv2.COLOR_BGR2RGB))
axes[0].set_title('Original', fontsize=14)
axes[1].imshow(cv2.cvtColor(degraded, cv2.COLOR_BGR2RGB))
axes[1].set_title('Bicubic (Degraded)', fontsize=14)
axes[2].imshow(cv2.cvtColor(output, cv2.COLOR_BGR2RGB))
axes[2].set_title('SRCNN (Super-Resolved)', fontsize=14)
for ax in axes:
ax.set_xticks([])
ax.set_yticks([])
plt.tight_layout()
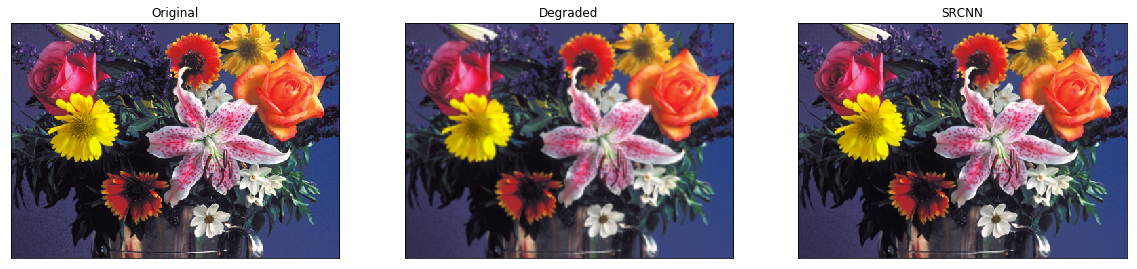
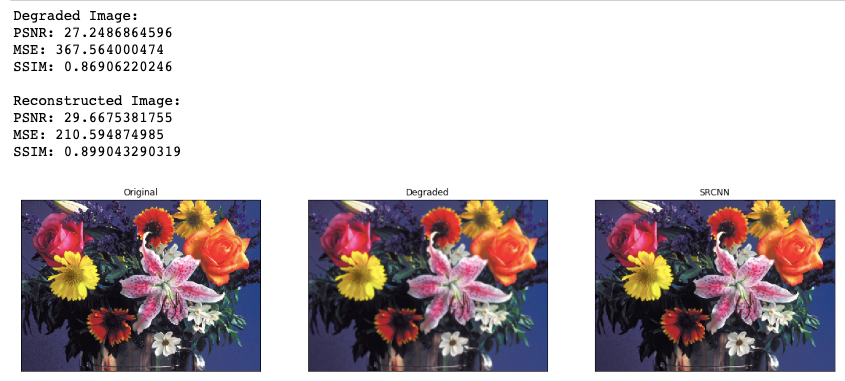
plt.show()Below are sample outputs comparing the Original, Bicubic Interpolated (degraded), and SRCNN Super-Resolved images. As you can see, SRCNN successfully restores sharper edges and finer textures compared to standard bicubic upscaling.
All 18 standard benchmark images are provided in the results/ directory:
| Set | Images |
|---|---|
| Set5 | baby_GT, bird_GT, butterfly_GT, head_GT, woman_GT |
| Set14 | baboon, barbara, coastguard, comic, face, flowers, foreman, lenna, monarch, pepper, ppt3, zebra |
To objectively measure how well SRCNN reconstructs high-resolution images, we use three widely accepted metrics:
- Measures: The ratio between the maximum possible power of a signal and the power of corrupting noise.
- Unit: Decibels (dB)
- Interpretation: Higher is better. Typical values range from 20 dB (poor) to 40+ dB (excellent). PSNR > 30 dB is generally considered visually acceptable.
- Formula:
- Measures: The average squared pixel-wise difference between the predicted and reference images.
- Unit: Pixel intensity²
- Interpretation: Lower is better. An MSE of 0 means the images are identical. It is sensitive to large pixel errors but less correlated with human visual perception.
- Formula:
- Measures: Perceptual similarity considering luminance, contrast, and structure.
- Range: 0 to 1
- Interpretation: Higher is better. SSIM = 1 means the images are perceptually identical. It correlates much better with human visual perception than PSNR/MSE.
- Why it matters: Two images can have low MSE but look very different, or high MSE yet look similar. SSIM captures the structural information our eyes actually care about.
This project uses the standard benchmark datasets from the original SRCNN paper:
- Set5 — 5 classic images widely used for SR evaluation
- Set14 — 14 additional images for more robust benchmarking
You can download the original datasets and MATLAB reference code from the official project page: 🔗 http://mmlab.ie.cuhk.edu.hk/projects/SRCNN.html
-
SRCNN Paper: Chao Dong, Chen Change Loy, Kaiming He, Xiaoou Tang. "Image Super-Resolution Using Deep Convolutional Networks." IEEE TPAMI, 2016.
arXiv:1501.00092 | PDF -
Official Project Page: http://mmlab.ie.cuhk.edu.hk/projects/SRCNN.html
-
Pre-trained Keras Weights: MarkPrecursor/SRCNN-keras
-
Convolutional Neural Networks (Wikipedia): https://en.wikipedia.org/wiki/Convolutional_neural_network
-
Keras Documentation: https://keras.io/
-
OpenCV Documentation: https://docs.opencv.org/
Contributions are welcome! If you'd like to improve this project, feel free to:
- 🐛 Report bugs by opening an issue
- 💡 Suggest features or enhancements
- 🔧 Submit pull requests with improvements
- 📖 Improve documentation
Please ensure your code follows the existing style and includes appropriate comments.
This project is licensed under the MIT License — see the LICENSE file for details.
MIT License

Copyright (c) 2019 Sajjad Salaria

Permission is hereby granted, free of charge, to any person obtaining a copy
of this software and associated documentation files (the "Software"), to deal
in the Software without restriction, including without limitation the rights
to use, copy, modify, merge, publish, distribute, sublicense, and/or sell
copies of the Software, and to permit persons to whom the Software is
furnished to do so, subject to the following conditions:
- The SRCNN architecture was originally proposed by the Multimedia Laboratory (MMLab) at The Chinese University of Hong Kong.
- Special thanks to the open-source community for maintaining Keras, TensorFlow, OpenCV, and scikit-image.
- This implementation is intended for educational and research purposes.
⭐ If you found this project helpful, please consider giving it a star! ⭐