
- Easy to source generic components
- Cheap - cost could be as low as $10 (including the valve)
- Easy to setup
- Few components
- No soldering required
- Scheduled watering based on soil moisture

Soil moisture, irrigation at 7:00 AM


| Component | Spec | Cost |
|---|---|---|
| Controller | ESP32-S2 | $2 |
| Soil moisture sensor | LM393 | $1 |
| Driver | L298N | $1.5 |
| Valve | 1/2" Solenoid 12V DC (Plastic) | $3.5 |
| Jumper wires | 10cm F-F | $0.5 |
| Power supply | 12V DC 1A | $1.5 |
| Total | $10 |
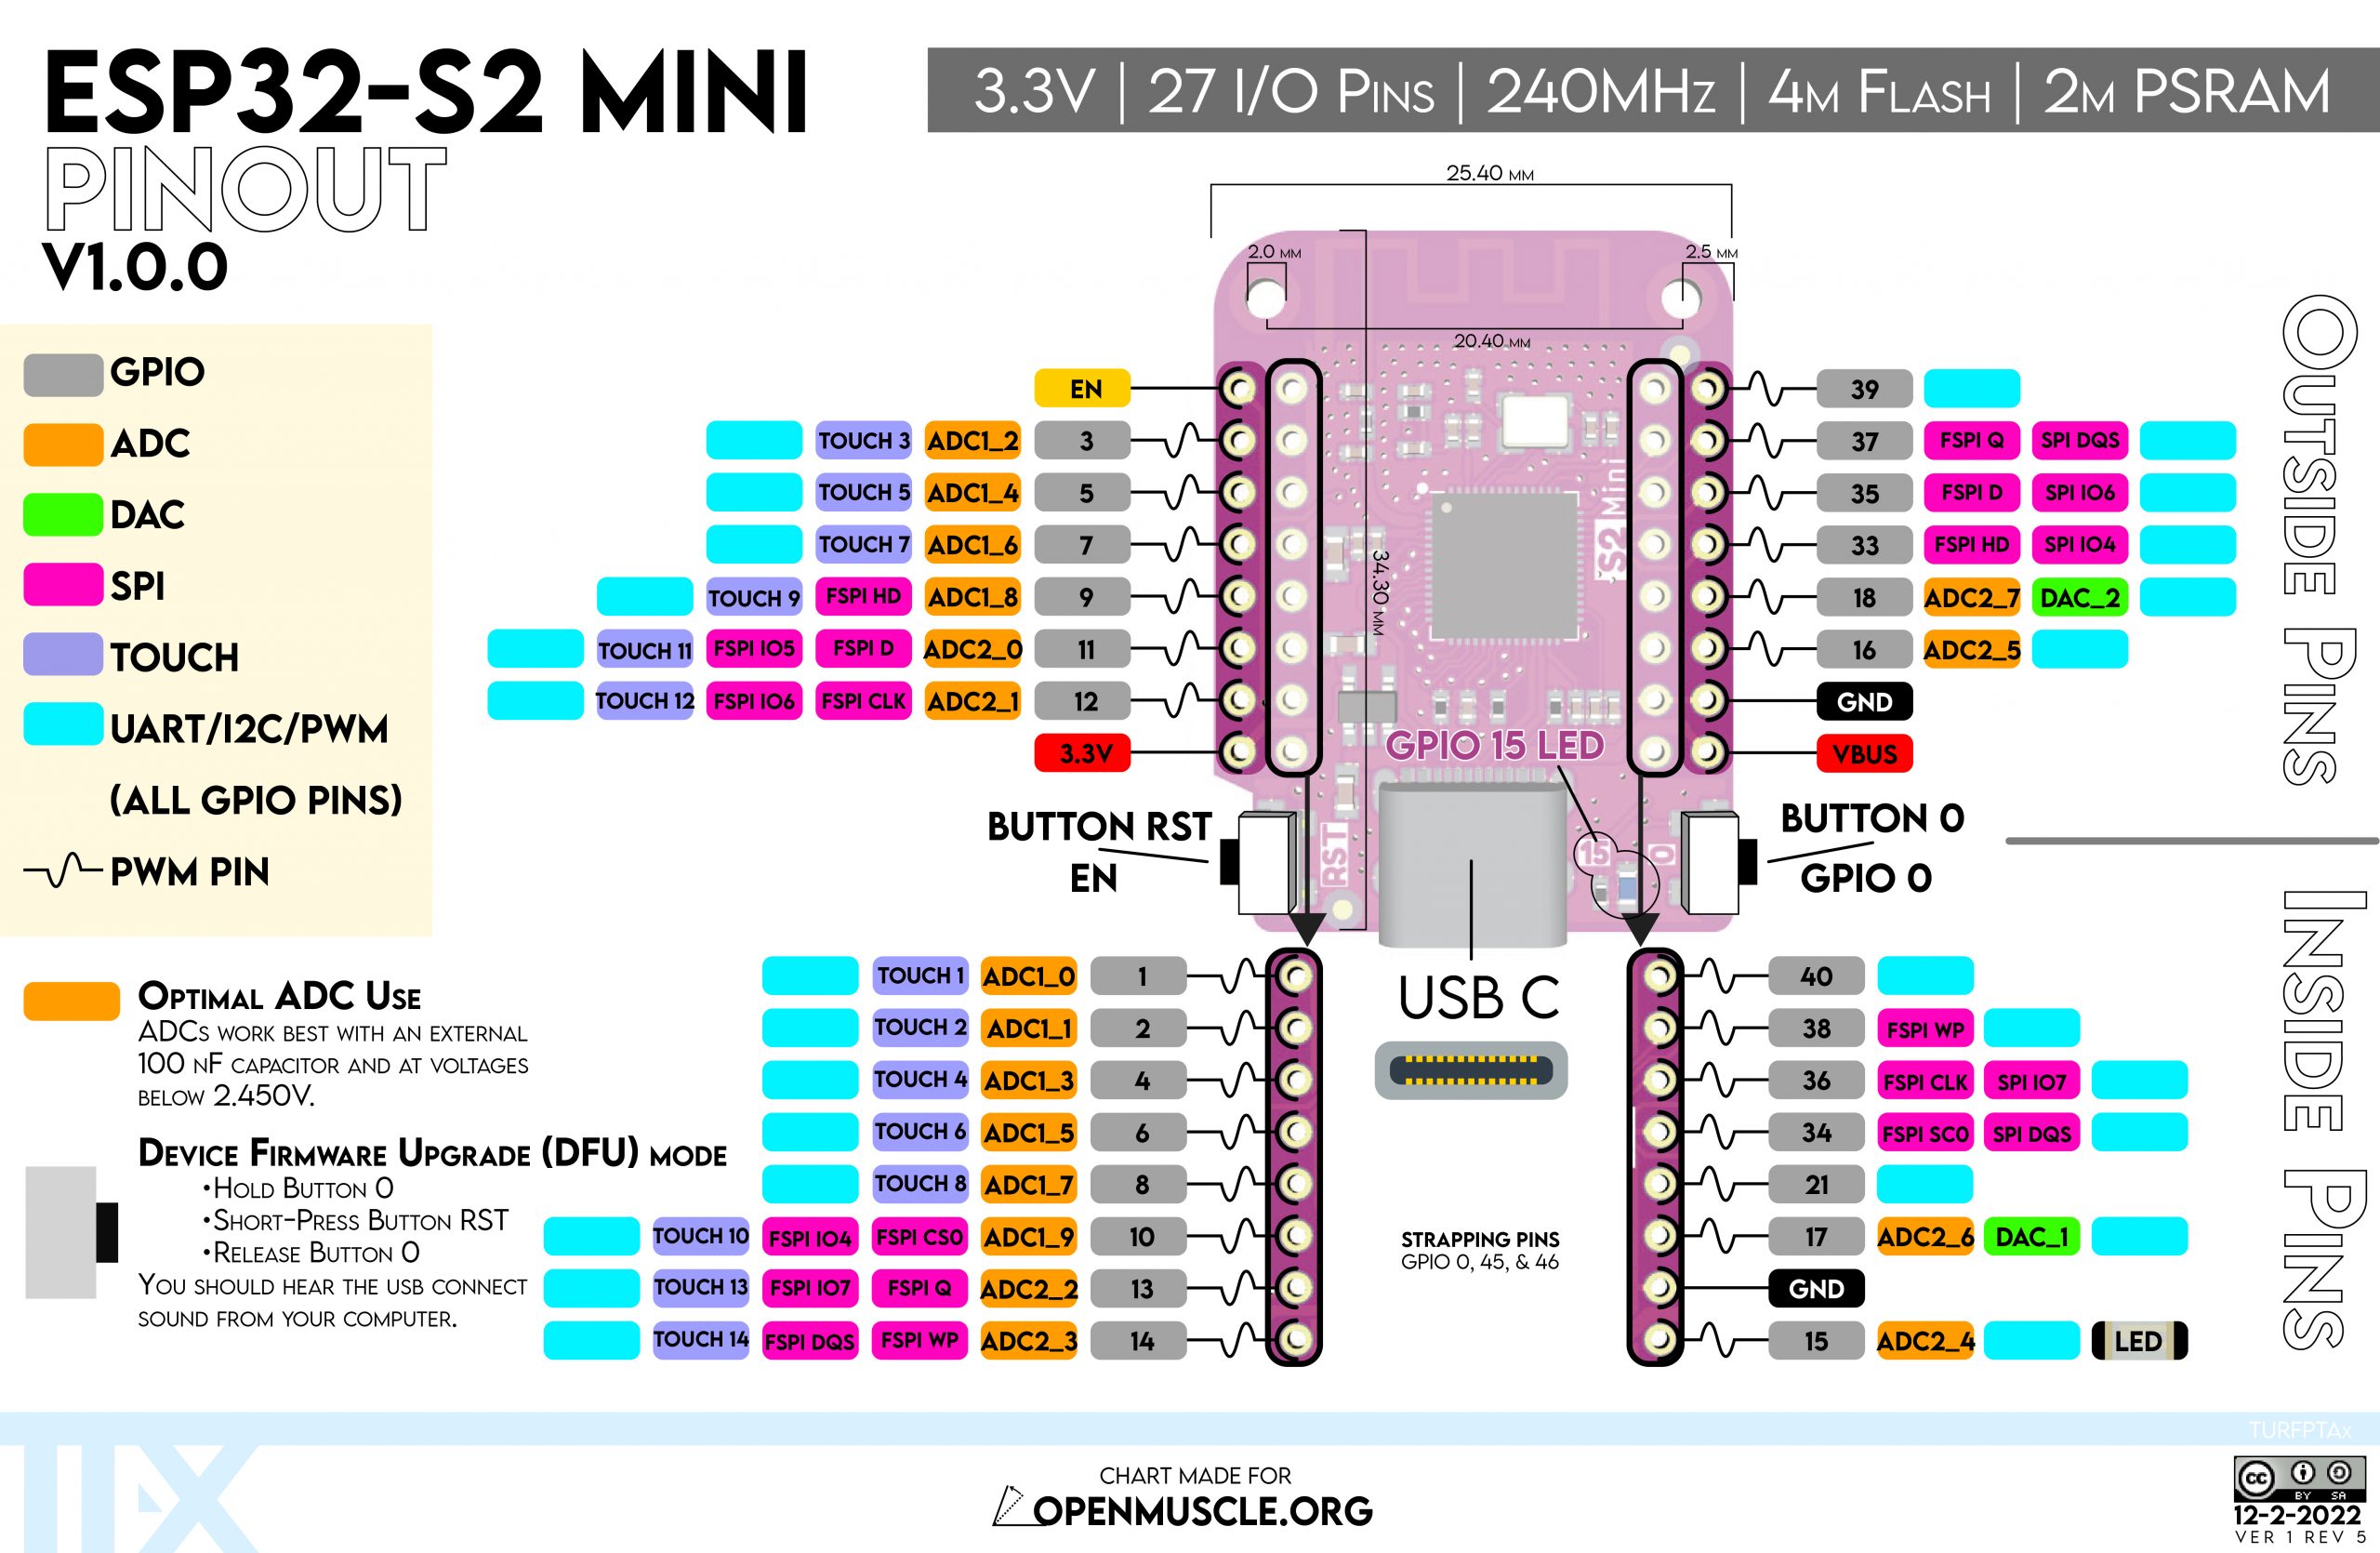
This project is based on ESP32-S2 + MicroPython
- Built-in WiFi
- Lots of GPIOs
- Easy to use - Thonny (Python IDE)
- Cheap
- Starting with a simple Digispark solution (Arduino based)
- Followed by WeAct RP2040 + MicroPython - this solution lacked network connectivity
- Raspberry Pi Zero W - bit of an overkill, there's no need for a full Linux system
- LOLIN D1 mini - ESP8266 + MicroPython - too little memory (met limit on global strings)
- 1/2" Solenoid 12V DC normally closed means that without power the valve is closed.
- DC Latching solenoid - Draws power only on state change Bermad S-392T-2W
- DC pump - 12V DC pump
Depends on the valve/pump used:
- Mechanical relays (Multi relay module) - most versatile, compatible with AC, DC & reverse polarity
- Solid state relays (Multi relay module) - compatible with DC only - no reverse polarity
- H-Bridge L298N - for closing by reversing polarity
Depends on the valve/pump used. The controller may be powered by a USB charger or VBUS pin. Note: The H-Bridge L298N has an onboard 5V regulator which can be used to power the controller via the VBUS pin.
- Build one based on a 10kΩ resistor
- Ground and VCC can be shared among multiple sensors.
- You can use any type of probe, such as a nail or stainless steel wire.
- Buy a LM393 module
- Saves power when waiting for the next watering cycle
- Thingspeak - Video
- Blynk - Video
There are two main ways to get the software onto the device:
This is the recommended method for first-time setup.
- Flash MicroPython: If your board is new, follow the instructions for your specific ESP32 board to flash the MicroPython firmware.
- Connect to your device using an IDE like Thonny.
- Copy Files: Copy
main.py,index.html, andsetup.htmlto the root directory of the device. - Reset the device.
If you already have a running version of RSI, you can use the web interface to upload new files. See the "Uploading a new version" section below.
Once the RSI software is on the device, you need to configure it to connect to your local WiFi network.
-
Enter WiFi Provisioning Mode:
- On initial setup, the device automatically enters WiFi provisioning mode if the config file is not found.
- Alternatively, you can force WiFi provisioning mode by pressing and holding the
BOOTbutton (usually GPIO0) on your ESP32 board within the first second of power-on. The onboard LED will blink rapidly to indicate it's in WiFi provisioning mode.
-
Connect to the Device's WiFi:
- The device will create its own WiFi hotspot.
- Network Name (SSID):
irrigation-esp32 - Use your computer or smartphone to connect to this network. No password is required.
-
Access the Setup Page:
- Once connected, open a web browser.
- Navigate to
http://192.168.4.1. This is the gateway address for the device's hotspot. - You should see the RSI WiFi Setup page.
-
Configure and Reboot:
- On the setup page, enter the SSID and Password for your home WiFi network.
- You can also set a Hostname for the device, which will allow you to access it on your local network using a friendly name (e.g.,
http://my-irrigation.local). - Click "Save and Reboot".
-
Connect on Your Network:
- The device will restart and connect to the WiFi network you provided.
- You can now disconnect your computer/phone from the
irrigation-esp32network and reconnect to your regular home network. - Access the main RSI interface by navigating to the hostname you set (e.g.,
http://my-irrigation.local) or by finding the device's IP address on your router.

Each zone represents a valve or irrigation output that can be controlled independently. Configure the following fields:
- Name: Descriptive name for the zone (e.g., "Front Yard", "Vegetable Garden")
- Master: Check if this zone should act as a master valve that turns on before any other zone and turns off after all zones are done
- Active is High: Check if the valve is activated when the GPIO pin is set to HIGH (unchecked means valve activates on LOW)
- On Pin: GPIO pin number to turn the valve on (for latching valves, this is the "open" pin)
- Off Pin: GPIO pin number to turn the valve off (for latching valves, this is the "close" pin; for regular valves, same as On Pin)
- Irrigation Factor Override: Manual override for irrigation duration factor (-1 = disabled, use schedule duration as is)
- Soil Moisture Dry: ADC reading value considered "dry" (irrigation starts below this value)
- Soil Moisture Wet: ADC reading value considered "wet" (irrigation stops above this value)
- Soil Moisture ADC Pin: GPIO pin connected to the analog output of the soil moisture sensor
- Soil Moisture Power Pin: GPIO pin used to power the soil moisture sensor (may be shared between zones as current is limited by a 10kΩ resistor)
Each schedule defines when and how a specific zone should be watered:
- Zone: Select which zone this schedule controls (master zones cannot be scheduled directly)
- Start Time: Time of day when irrigation should begin (24-hour format)
- Duration: How long to run irrigation in minutes
- Enabled: Check to enable this schedule (uncheck to temporarily disable without deleting)
- Weekdays: Select which days of the week this schedule should run (M=Monday, T=Tuesday, W=Wednesday, T=Thursday, F=Friday, S=Saturday, S=Sunday)
- Use Soil Moisture Sensor: Check to use soil moisture readings to determine if irrigation is needed
- Interval: Pulsed irrigation (for germination / misting etc.) - time between pulse start to next pulse start in seconds (0 = continuous watering)
- Interval On: Pulsed irrigation - how long each pulse should last in seconds
- Expiry: Optional expiration date/time for temporary schedules (leave blank for permanent schedules)
- Pause Schedules: Temporarily pause all scheduled irrigation for a specified number of hours
- Ad-hoc Irrigation: Manually trigger irrigation for a specific zone and duration in minutes (may be stopped by setting to 0)
These settings are configured during the First-Time Configuration process on the setup page. They can also be modified later from the main application's configuration screen.
- ssid: Your WiFi SSID (network name) - leave empty to disable WiFi connection
- password: Your WiFi password
- hostname: The hostname of the controller for network identification (default:
rsi-+ last 3 MAC address bytes, e.g.,rsi-a1b2c3). Allows connecting using hostname.local
- thingsspeak_apikey: ThingSpeak Write API key for sending telemetry data (leave empty to disable)
- send_interval_sec: Interval in seconds between sending data to monitoring service (default: 300 seconds = 5 minutes)
- high_is_dry: Check if sensor reads high values when soil is dry (default: true for most sensors)
- sample_count: Number of ADC readings to average for each soil moisture measurement (default: 3)
- enable_irrigation_schedule: Enable/disable all scheduled irrigation (default: true)
- timezone_offset: Local timezone offset in hours from UTC (default: -7 for PDT/PST)
- relay_pin_id: GPIO pin ID of the master relay that powers valve drivers (default: -1 = disabled)
- heartbeat_pin_id: GPIO pin ID of the onboard LED for status indication (auto-detected based on board)
- relay_active_is_high: Check if master relay activates when pin is HIGH (default: false)
- heartbeat_high_is_on: Check if onboard LED activates when pin is HIGH (default: auto-detected based on board)
- enable_power_saving_mode: Enable/disable power saving mode, which puts the MCU to light sleep between tasks (default: false)
- level: Minimum log level to record (10=debug, 20=info, 30=warning, default: 20)
- max_lines: Maximum number of log entries to keep in memory (default: 50)
Advanced settings for time synchronization when NTP is unavailable (uses MCU temperature cycles):
- sync_days: Number of days to monitor temperature patterns for time sync (default: 1)
- slices_per_day: Number of temperature measurements per day (default: 48 = every 30 minutes)
- samples_per_slice: Number of temperature readings per slice for averaging (default: 15)
- Apply Update: Manually trigger an OTA update to a specific version tag. The latest version tag is automatically fetched from GitHub.
- Apply: Save the current configuration to the device
- Save As: Download the configuration as a JSON file for backup
- Open: Upload a previously saved configuration file
- Status: Real-time overview of the system state, including MCU temperature, memory usage, valve status, schedule status, and sensor readings.
- Log: View the latest system events, warnings, and errors directly in the web interface.
You can easily update your device directly from the web interface under Settings > System. The device will fetch the latest version tag from GitHub automatically, or you can manually enter a specific version tag. Click "Apply Update" to download the files and reboot.
This method is particularly useful for development. If you wish to upload local modifications, you can upload files manually:
$ HOST="s2demo.local"
$ for f in index.html setup.html main.py; do curl -X POST --data-binary @$f $HOST/file/$f | jq; done
$ curl -X PUT $HOST/reboot
$ sleep 15 && python3 tests/test_integration.py $HOST
$ curl $HOST/status | jq