

This workspace is an example integration of NVIDIA Isaac Sim with Flexiv Elements Studio, connected via Flexiv Sim Plugin. It demonstrates how to use the Flexiv Sim Plugin API alongside the Nvidia Isaac Sim API to relay robot control commands and physics state between Elements Studio and Isaac Sim, so that simulated Flexiv robots are driven by the same force-torque controller used on real robots and can be programmed with the Flexiv RDK.
┌─────────────────────────────────────────┐
│       User Program with RDK Client      │
│          (send robot commands)          │
└───────────────────┬─────────────────────┘
                    │ RDK API
                    ▼
┌─────────────────────────────────────────┐
│         Flexiv Elements Studio          │
│   (simulated controller + RDK Server)   │
└───────────────────┬─────────────────────┘
                    │ Flexiv Sim Plugin API
                    ▼
┌─────────────────────────────────────────┐
│          Flexiv Isaac Sim Workspace     │
│ (Flexiv Sim Plugin API + Isaac Sim API) │
└───────────────────┬─────────────────────┘
                    │ Isaac Sim API
                    ▼
┌─────────────────────────────────────────┐
│           NVIDIA Isaac Sim              │
│           (physics engine)              │
└─────────────────────────────────────────┘
| Supported OS | Supported processor | Supported language | Isaac Sim version |
|---|---|---|---|
| Ubuntu 22.04, 24.04 | x86_64 | Python | 6.x |
Each release of this workspace works with one release line of Flexiv Sim Plugin (the flexivsimplugin Python package) and of Flexiv Elements Studio:
| Workspace release | Isaac Sim version | flexivsimplugin | Elements Studio |
|---|---|---|---|
| v2.2.x | 6.x | 2.2.x | v3E.2 |
| v1.4.0 | 6.x | 1.3.0 | v3.11.2 |
| v1.3 | 4.5, 5.0 | 1.2.x | v3.10, v3.11 |
The v2.x branch holds the latest release line. For an earlier one, check out its release tag, e.g. git checkout v1.4.0.
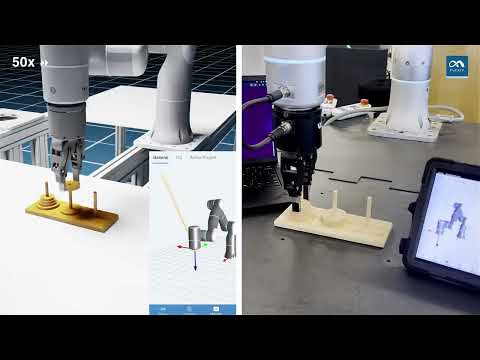
Rizon_PIH_in_isaac_sim.mp4
Rizon_polish_in_isaac_sim.mp4
dual_Rizon_polish_in_isaac_sim.mp4
Before using the Flexiv Isaac Sim Workspace, install Flexiv Elements Studio and create a simulated robot by following Flexiv Elements Studio Setup.
The workspace setup installs the flexivsimplugin Python package into Isaac Sim's bundled Python. That plugin is the middleware connecting the Flexiv-Isaac Bridge App to Elements Studio. Everything else runs straight from this repo, so nothing is copied into Isaac Sim:
| Folder | Contents |
|---|---|
assets/ |
USDs of every Flexiv robot, the grippers and the example environments |
examples/ |
The Flexiv-Isaac Bridge App, its configuration files and the follow-target example |
flexiv_isaac/ |
The Python package the examples import: robot, calibration, controllers and tasks. The pick_place and stacking tasks don't work yet. |
tools/ |
Connection check, RDK, and a calibrated USD export the bridge app does not need |
This workspace runs against either a natively installed Isaac Sim or the Isaac Sim container. Where later sections say <isaac_sim_root_dir>, they mean wherever Isaac Sim lives: ~/isaacsim (or your install path) for Option A, and /isaac-sim inside the container for Option B. Run the commands in later sections from the root of this repo, which is /workspace inside the container.
-
Install NVIDIA Isaac Sim.
-
Note down Isaac Sim's installation directory, e.g.
~/isaacsim. -
From this repo, set up the workspace:
bash setup_ws.sh ~/isaacsim
-
Follow NVIDIA's container installation guide to set up the NGC prerequisites (an NGC account and
docker login). The image itself is pulled automatically on first launch. -
From this repo, launch a shell in the container:
bash launch_isaac_sim.sh shellThis mounts this repo at
/workspaceinside the container, along with the persistent cache directories, and sets the options Isaac Sim needs. The mount is read-only, so edit the configuration files in this repo on the host; the container sees each change straight away. When a local display is available, the shell forwards it, so the bridge app and the examples open their Isaac Sim window. The script's other modes,nativeandwebrtc, start the plain Isaac Sim app straight away, without a shell to set up this workspace in; runbash launch_isaac_sim.sh -hfor all options. -
Inside the container, set up the workspace. The shell starts in
/workspace:bash setup_ws.shIsaac Sim is auto-detected at
/isaac-sim.The container runs with
--rm, so everything installed inside it is discarded on exit. Re-run this step after each launch; it takes seconds once the wheel is cached.
The container runs on the host network, because the plugin discovers Elements Studio over Zenoh multicast, which does not cross Docker's default bridge network. On the default network the Bridge App starts normally but never connects.
If you used an earlier release of this workspace, its files installed into Isaac Sim are no longer used, and the Python package isaacsim.robot.manipulators.examples.flexiv is now flexiv_isaac.
The setup installs the newest 2.2.x release of flexivsimplugin, the release line this workspace supports, so re-running it picks up plugin bug fixes. To install a specific version instead, pass it with --plugin-version, e.g. --plugin-version 2.2.0.
To verify that the workspace setup is successful, run the example Python application:
<isaac_sim_root_dir>/python.sh examples/follow_target_with_rmpflow.py
WARNING: When running Isaac Sim for the first time, it takes a couple of minutes to warm up the shader cache. You will notice that the CPU is fully loaded and the Isaac Sim window seems frozen. Please wait patiently and do not force quit the program.
After the example program is up and running, select the TargetCube prim under World from the Stage view, then drag it around, the robot TCP should follow the cube. The flange keeps pointing down, so it follows wherever it can reach with that orientation, mostly in front of the robot.
-
Edit the configuration file
examples/single_arm_app_config.yamlaccording to the instructions in it. Optionally, with the simulated robot started in Elements Studio, check that Isaac Sim can reach it before starting the app:<isaac_sim_root_dir>/python.sh tools/check_sim_plugin_connection.py "Enlight L-123456"It reports for each serial number whether the plugin finds the robot, and what to check if not.
-
Start Flexiv-Isaac Bridge App using configurations in
single_arm_app_config.yaml:<isaac_sim_root_dir>/python.sh examples/flexiv_isaac_bridge_app.py --config examples/single_arm_app_config.yaml -
The app will launch an Isaac Sim window and start the physics loop (i.e. Play) automatically.
-
Go back to Elements Studio. Go to Settings → Remote Mode, then enable Remote Mode and select Ethernet from the drop-down list; the app needs it to pull the robot's calibration through RDK, see Robot calibration. Then restart the exited simulator by toggle on the Connect button.
-
Wait for the connection to establish. If the connection is successful, you should see in Elements Studio a robot at home pose with no error. The app then calibrates the robot, see below, and logs
Calibrated robot [...].
Each robot's kinematics are calibrated per unit, e.g. where an Enlight LL's two arms are mounted. The bundled USDs carry a model's nominal kinematics, so the app calibrates each robot in Isaac Sim once it connects, in three steps:
- It connects to the robot in Elements Studio with the nominal kinematics of the USD. The robot's RDK server is only reachable while it is connected.
- It pulls the robot's calibrated kinematics through Flexiv RDK, which
setup_ws.shinstalls, while the physics loop keeps running. RDK needs Remote Mode (Ethernet) on in Elements Studio. - It applies them to that robot in Isaac Sim, then resets the simulation for about a quarter of a second, keeping every robot's joint positions.
Nothing is written to disk, so the calibration is pulled again each time the app starts. The kinematics template RDK fills in is fetched from flexiv_description, so the computer needs internet access. If the calibration cannot be pulled, e.g. because Remote Mode is off, the app logs a warning and the robot keeps the nominal kinematics. Calibration is supported for the Rizon series, Enlight L and Enlight LL; other models log a warning and keep the nominal kinematics.
To use a calibrated USD outside this app, e.g. in your own Isaac Sim scenes, export one with tools/calibration/export_calibrated_usd.py.
Drive the robot through RDK, with Remote Mode still on. tools/rdk/joint_swing.py swings every joint of every arm of the robot around its home pose. Run it with Isaac Sim's Python, which setup_ws.sh installed RDK into, and check that the robot in Isaac Sim swings with it:
<isaac_sim_root_dir>/python.sh tools/rdk/joint_swing.py "Enlight L-123456" --amplitude 6 --cycles 3
In Remote Mode, Elements Studio's jogging and free-drive controls are disabled, so drive the robot through RDK, see Control the simulated robot(s) programmatically.
To restart the whole setup after the first run:
- Start the Flexiv-Isaac Bridge app first.
- Then start the simulated robot in Elements Studio.
If you have made some changes and need to restart the Isaac Sim app:
- Close Flexiv-Isaac Bridge app.
- In Elements Studio, click CHANGE CONNECTION, then toggle off the Connect button to close the simulated robot. You do not need to exit the whole Elements Studio program.
- Restart Flexiv-Isaac Bridge app.
- Toggle on the Connect button to restart the simulated robot.
Alternatively, you can leave the simulated robot running and just restart the Isaac Sim app. The simulated robot in Elements Studio will sync with Isaac Sim after the app is restarted. However, soft error might occur and you can just clear them from Elements Studio and continue to normal operations.
A dual-arm robot, such as Enlight LL, MICO Core, MICO Plus or MICO Ultra, is one robot: one serial number and one controller drive both arms and any waist joints (external robot axes). So it is a single robot block in the configuration file, not two, and it needs only one Elements Studio.
-
Edit the configuration file
examples/mico_app_config.yaml: setserial_numberto the simulated robot you created in Elements Studio, andusdto the USD of the same model. For an Enlight LL, useenlight_ll_app_config.yamlinstead. Where its two arms are mounted is part of the robot's calibration, so the bundledenlight_llUSD has both arms at the origin, overlapping, until the app calibrates the robot once it connects. -
Start Flexiv-Isaac Bridge App using configurations in
mico_app_config.yaml(orenlight_ll_app_config.yaml):<isaac_sim_root_dir>/python.sh examples/flexiv_isaac_bridge_app.py --config examples/mico_app_config.yaml
The robot states and commands carry joint values without joint names, so the app sends and applies them in the order the controller uses, which it derives from the USD the same way the controller derives it from the URDF; the order is printed at startup, and initial_q uses the same order. If the controller's robot model has a different number of joints than the USD, the app logs an error and ignores the commands. Each arm can carry its own gripper, mounted on system1_left_arm_flange or system1_right_arm_flange and driven by its own pair of digital outputs (DOUT[0] / DOUT[1] open / close the first gripper, DOUT[2] / DOUT[3] the second, by default).
This framework supports simulating and controlling multiple robots, each with its own Elements Studio. (multi_robot_app_config.yaml sets up two single-arm robots; for one robot with two arms, see Dual-arm robots.)
-
Add multiple robots in the configuration file
examples/multi_robot_app_config.yaml. -
Start Flexiv-Isaac Bridge App using the updated configurations in
multi_robot_app_config.yaml:<isaac_sim_root_dir>/python.sh examples/flexiv_isaac_bridge_app.py --config examples/multi_robot_app_config.yaml -
Find a second Ubuntu 22.04 computer, connect it to the first computer via Ethernet cable. Then on the first computer, check that this wired Ethernet connection is visible in the network settings, then change the IPv4 setting of this wired connection to "Shared to other computers". Alternatively, connect both computers to the same network router via wired connection.
-
Make sure both computers are able to ping each other.
-
Install Flexiv Elements Studio on the second computer, then create a new simulated robot. Now each computer has a robot controller with Elements Studio.
-
Start the first simulated robot on the first computer, then wait for connection with Isaac Sim. You should see one of the robots in Isaac Sim moves a little bit when the connection is established.
-
Start the second simulated robot on the second computer, then wait for connection with Isaac Sim. You should see the other robot in Isaac Sim moves a little bit when the connection is established.
-
Execute test projects from both Elements Studios and check that both robots are working in Isaac Sim.
You can collect data from the simulated robot(s) using Flexiv DDK (Data Distribution Kit) at up to 1kHz frequency:
- Set up Flexiv DDK according to the instructions found in the repo.
- Start Isaac Sim and Elements Studio.
- Run DDK programs to collect data from one or more simulated robots.
Note: the DDK program doesn't have to run on the same computer as the Elements Studio, it can be any computer that's under the same local network as the Elements Studio computer.
Besides using the drag-and-drop graphical interface in Elements Studio to create projects to control the simulated robot(s), you can also control them programmatically using Flexiv RDK (Robotic Development Kit) in a real-time or non-real-time manner:
-
setup_ws.shinstalls RDK into Isaac Sim's Python. To run RDK programs with another Python, set up Flexiv RDK according to the instructions found in the repo. -
Start Isaac Sim and Elements Studio, with Remote Mode on, as in Run Flexiv-Isaac Bridge App.
-
Run RDK programs to control one or more simulated robots.
For example, tools/rdk/joint_swing.py swings every joint of every arm of a robot around its home pose, so you can see both arms of a dual-arm robot move in Isaac Sim:
<isaac_sim_root_dir>/python.sh tools/rdk/joint_swing.py "Enlight LL-123456" --amplitude 6 --cycles 3
Note: the RDK program doesn't have to run on the same computer as the Elements Studio, it can be any computer that's under the same local network as the Elements Studio computer.