
The project is aimed for beginners who want to get familiar with Git and GitHub workflows, debug Linux errors and work with basic Linux commands.
Because this project repository is owned by me, you don't have permission to directly make changes. Thus, I want you to fork this repository. When you fork a repository, you create a copy of the original repository under your own GitHub account. This copy is completely separate from the original repository, so you can make changes to it without altering the original project.
- Fork this repo by clicking Fork in the top-right corner of the page.
- Clone your forked repository by:
Change
git clone https://github.com/<your-username>/<your-project-repo-name>
<your-username>and<your-project-repo-name>according to your GitHub username and the name you gave to your fork. E.g.git clone https://github.com/johndoe/INTLinuxProject. - Open up the repository folder via your favorite IDE (Pycharm, VSCode, etc..) as a new project.
Note
By working on this project, you are generating an activity on your GitHub profile. This activity is visible to recruiters and potential employers, providing them with insights into your coding habits, projects, and overall engagement. Think of it as your digital "business card" for people who are interested in your technical experience.
Great, let's get started...
The Linux Kernel was presented in our first linux lecture - the main component of a Linux OS which functions as the core interface between a computer’s hardware and its applications.
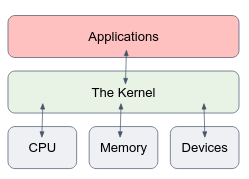
Then we moved to learn how to use the Terminal and communicate with the OS using commands such as ls or chmod.
But how does it really work? we type a command, hit the Enter key, and then what happen? This question tries to investigate that point.
Under the hood, linux commands are compiled C code (get yourself to know what is a compilation process if you don't know..). The C code contains system calls. System calls are the fundamental interface between an application and the Linux kernel.
In simple words, when your application wants to use the hardware (e.g. write data to the disk), it invokes a system call to the Linux Kernel, and the linux kernel talks with the hardware on your behalf. Read more about what are System Calls.
strace is a Linux command, which traces system calls and signals of a program.
It is an important tool to debug your programs in advanced cases.
In this question, you should follow the strace output of a program in order to understand what exactly it
does (i.e. what are the system calls of the program to the kernel). You can assume that the program does only what you can see by using strace.
To run the program, open up a Linux terminal in an empty directory and use the wget command to retrieve program from the internet:
# for arm64 CPU architectures
wget https://alonitac.github.io/DevOpsTheHardWay/linux_project/arm64/whatIdo

# for amd64 (x86_64) CPU architecture
wget https://alonitac.github.io/DevOpsTheHardWay/linux_project/amd64/whatIdo
Depending on the type of CPU your computer has, you'll need to use the appropriate command.
If you're unsure about your CPU architecture, you can usually find this information by running a command like uname -m in the terminal.
- Give the
whatIdofile an exec permissions (make sure you don't get Permission denied when running it). - Run the program using strace:
strace ./whatIdo. - Follow strace output.
Tip
Many lines in the beginning are part of the load of the program. The first “interesting” lines comes only at the end of the output.
In the SOLUTION file, write a brief description of what the program does. Don't copy & paste the terminal output as your answer, neither explain any single command.
Try to get a general idea of what this program does by observing the sys calls and the directory you've run the program in.
As you may know, the chmod command utilizes binary numbers to set permissions in Linux.
Let's work a bit with binary numbers.
- Convert the following binary numbers to decimals:
111,100,10110. - What is the available decimal range represented by 8 bits binary number?
- Given a 9 bits binary number, suggest a method to represent negative numbers between
-255to255. - Suggest a method to represent a floating point numbers (e.g.
12.3,15.7,0.2) using 8 bits binary numbers.
Uber has an automated daily backup system. Every day another backup file is being created in the file system according to the following format: backup-YYYY-MM-DD.obj (e.g. backup-2023-03-01.obj).
To be able to restore the system from a backup copy in a convenient way,
they want to point to the last generated backup file using a static file named latest-backup.obj. To do so, they create a symbolic link pointing to the last generated backup file.
- Let's create the daily backup file:
FILENAME=backup-$(date +"%Y-%m-%d").obj
touch $FILENAME
echo "backup data..." >> $FILENAME- Then, create a symlink (soft link) to the daily backup file:
ln -s $FILENAME latest-backup.objAt some point in the development lifecycle of the product,
the DevOps team has decided to organize all backup links in a directory called backups. They moved the link latest-backup.obj into backups directory:
mkdir backups
mv latest-backup.obj backups/
What's wrong here? provide a fix to Uber's code.
- Open up a Linux terminal and perform:
wget https://alonitac.github.io/DevOpsTheHardWay/linux_project/secretGenerator.tar.gz-
Use the
tarcommand to extract the compressed file. Enter thesrcdirectory. Explore the files and their content. -
Your goal is to generate a secret. The secret is generated once the following command is executed successfully (with exit code 0):
/bin/bash generateSecret.sh. -
Once you've generated the secret, copy it to the designated place in the
SOLUTIONfile (exactly 32 characters, without spaces). -
Using
nanoor your favorite text editor, editsrc/yourSolution.shand write a series of commands, one on each line, to generate the secret. Once done, given a clean version of thesrcdirectory (without the changes you've made), you should be able to run/bin/bash yourSolution.shwithout any errors to generate the secret:cd src /bin/bash yourSolution.sh -
Finally, to include your solution in the project, copy the content of
src/yourSolution.shinto the fileyourSolution.shin this repo.
Finished the project? it's time to submit your solution for testing.
In software engineering, testing is essential for ensuring the reliability and quality of the code that's delivered to production. Similarly, your project would be tested to ensure it meets basic standards of correctness. This way, you'll receive immediate feedback and can quickly fix issues.
In order to deliver your project for testing, you need to save your changes (a.k.a. Commit) and upload them to GitHub (a.k.a. Push).
We'll guide you through these steps:
-
Commit your changes through PyCharm.
If it's the first time ever you're committing, PyCharm may ask you to set your Git username and email. Feel free to specify any details you want.
The only two files that have to be committed are
SOLUTIONandyourSolution.sh. In the commit message, write some info regarding your commit, and click the Commit button.Commit messages are usually free text written by the developer, providing some information regarding the changes she did. Examples could be something like "initial solution" or "linux project solution - work in progress" or "linux project - final solution!". Feel free to fix your code and commit the changes again and again. You can commit as much as you want.
-
Next, push your commits to GitHub.
-
To watch the automated test execution on your solution:
-
In your GitHub repo main page, navigate to Actions.
You may need to enable GitHub Actions for the first time if it's not already enabled. Free GitHub accounts typically offer sufficient execution time to run the project tests.
-
In Actions page, enter the executed workflow run (you'll recognize it by your commit message).
-
If there are any failures, click on the failed job and read the test logs carefully. Try to understand the root cause of the issue.
-
Fix the issue in your local PyCharm environment, then commit and push again.
-
Upon successful test execution, you'll see a green checkmark (✅) and the following message would be printed in the test logs:
Well Done! you've passed all tests