
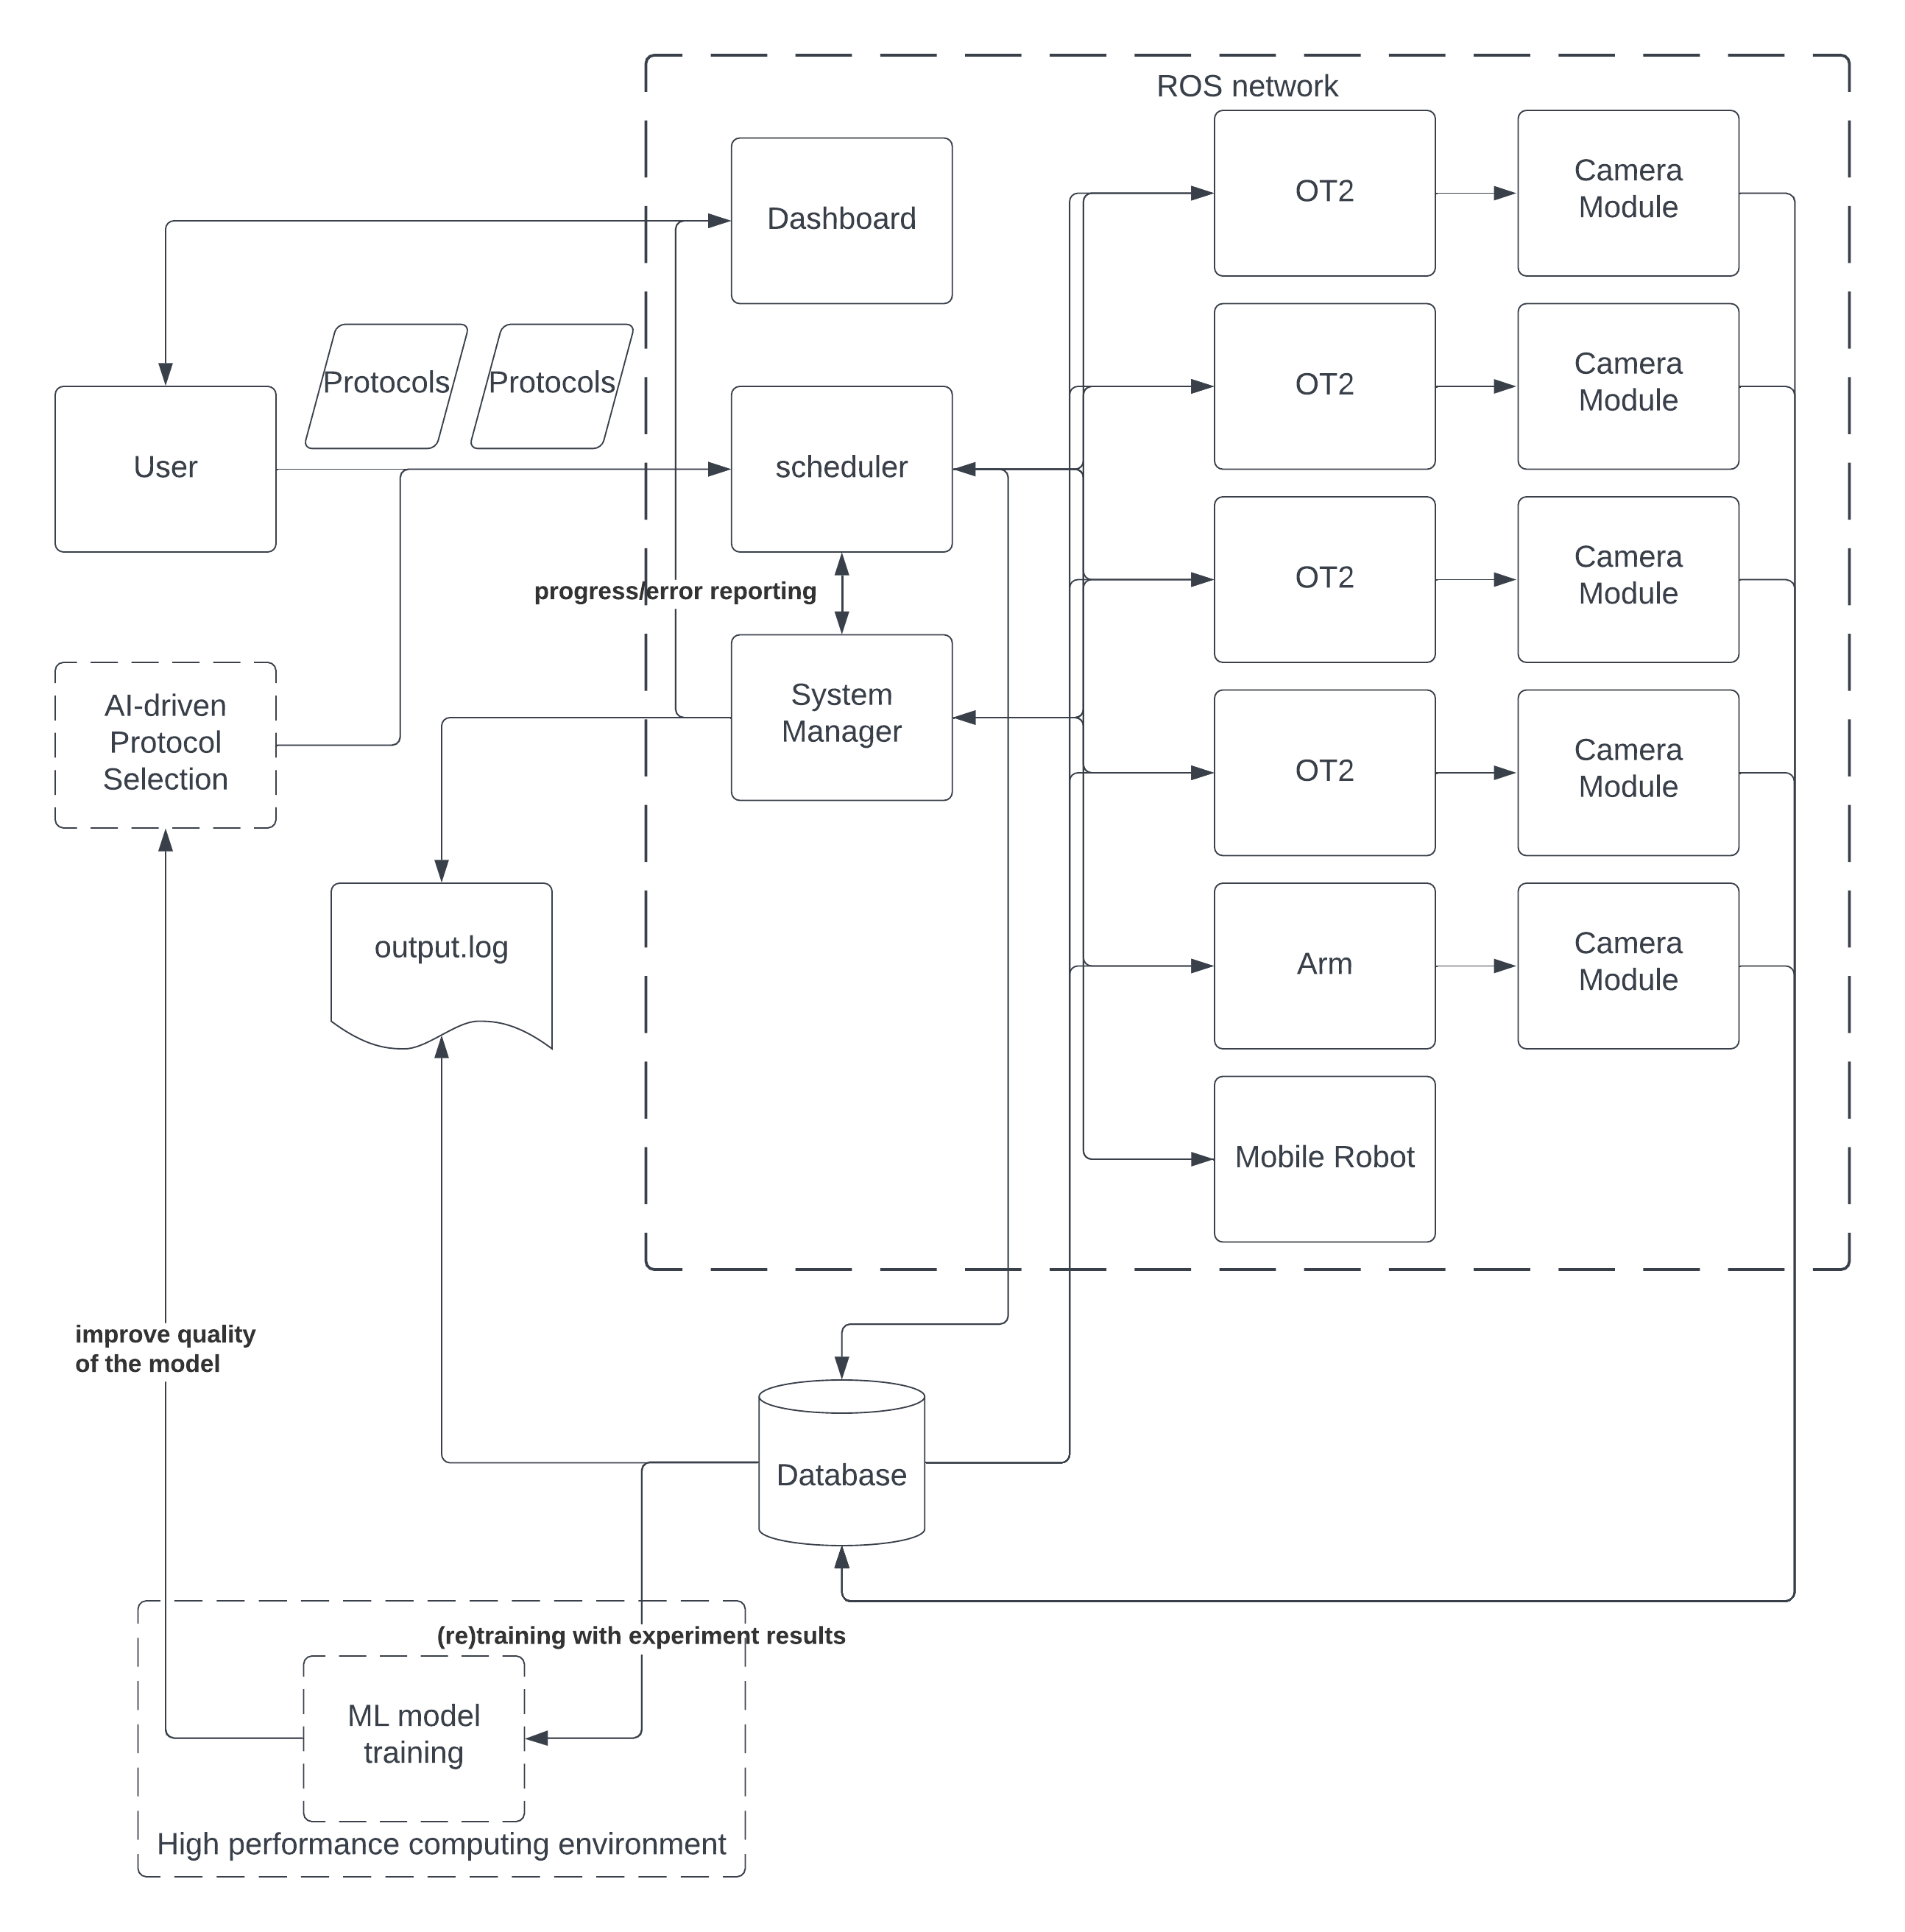
The ot2_workcell repo consists of a collection of ROS2 packages which work in tandem to operate the Opentrons OT2-based liquid handling operations of Argonne National Laboratory's Rapid Prototyping Lab (ANL RPL).
This so far includes a workcell manager, OT2 controller, plate-handling robotic arm controller, each of the previous component's respective clients, and a set of common interfaces, with the ability to add new components on an as-needed basis.
This workcell will eventually support:
- Dynamic, dependency-driven and task-based resource scheduling
- Resource reservations
- Intelligent error handling and recovery
- Closed-loop AI experimentation and "Autonomous Discovery" functionality
This is assuming an Ubuntu 20.04 environment with ROS Foxy installed.
cd ~source /opt/ros/foxy/setup.bashmkdir -p ~/ot2_ws/srccd ~/ot2_ws/srcgit clone https://github.com/AD-SDL/ot2_workcell.gitcd ot2_workcell && git clone https://github.com/AD-SDL/ot2_driver.git && git clone https://github.com/AD-SDL/pf400_driver.git && git clone https://github.com/AD-SDL/workcell_manager.gitBring in OT2 driver / PF400 driver / Scheduler Drivercd ~/ot2_wsrosdep update && rosdep install -i --from-path src --rosdistro foxy -ysudo apt install python3-colcon-common-extensionscolcon buildsource install/setup.bash
- Note No need to do this anymore, modify the launch files. In
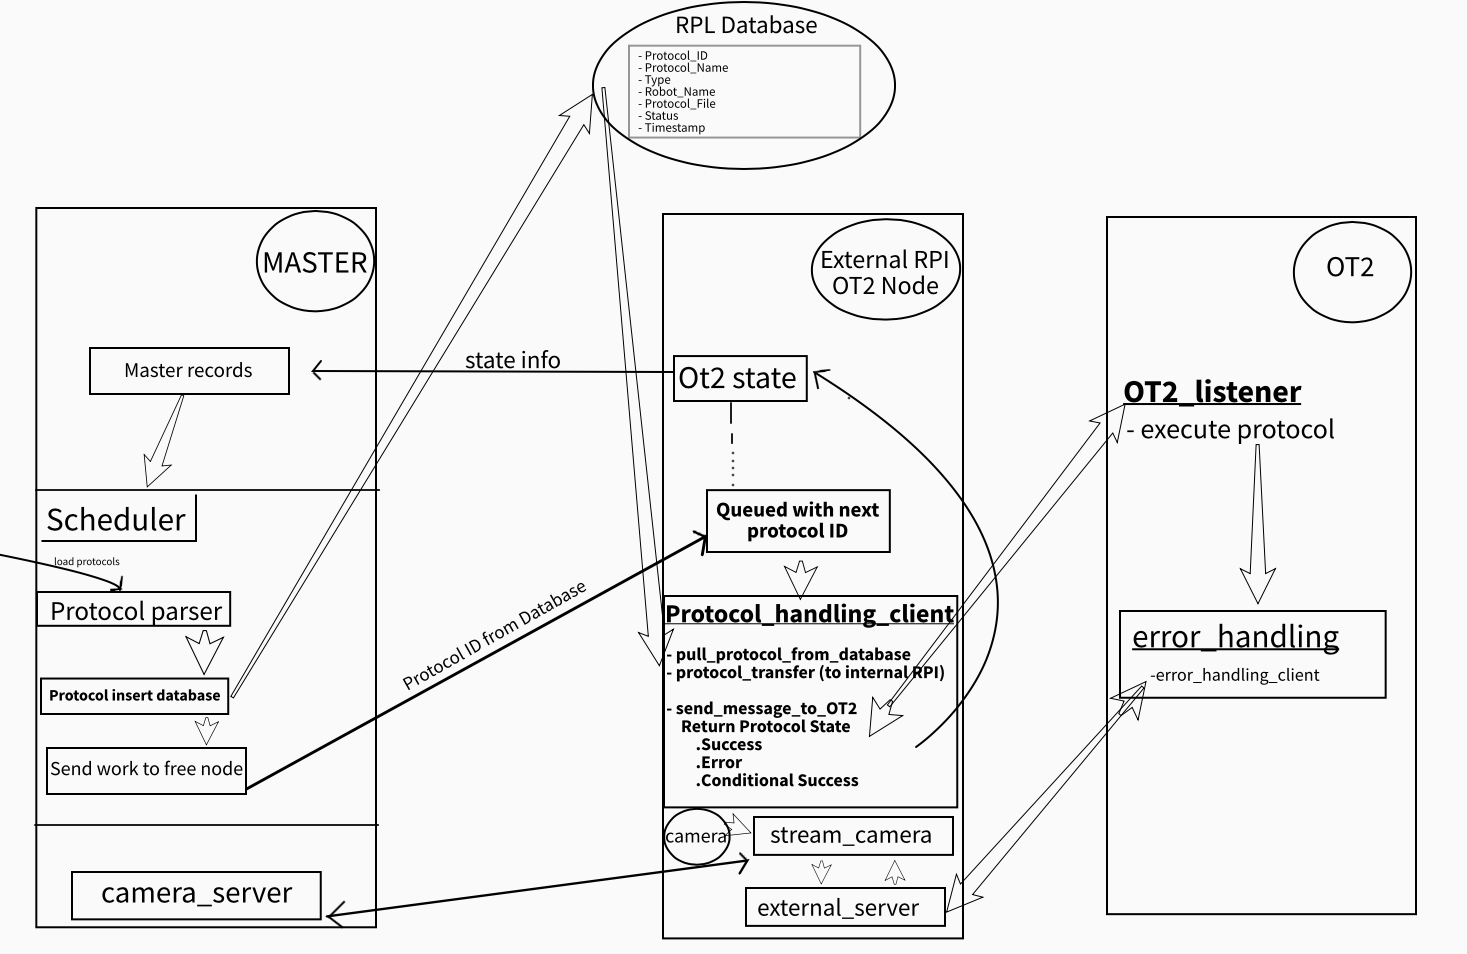
ot2_driver_pkg/protocol_handler/protocol_handling_client.pyin the functionsend_message_to_OT2(...)sock.connect(...) needs to be changed to your IP and whatever port you want - To Install Mysql Database Server.
- Note: Installation process is included for testing purposes with the local setups. Eventually, Mysql server will be runnnig on the servers located in Argonne National Laboratory and this process will not be necessary.
sudo apt-get update && sudo apt-get upgradesudo apt install mysql-servermysql --version->> Check if the installation was successful
- Configure Mysql Server for Remote Connections
sudo nano /etc/mysql/mysql.conf.d/mysqld.cnf->> Edit "bind-address = 127.0.0.1". Use "0.0.0.0" for all remote connections (not suggested for security reasons) or use the IP address of the machine that will be used for remote connectionssudo systemctl restart mysqlsudo mysql -u root->> Log in to MySQL ServerCREATE USER 'username'@'remote_server_ip' IDENTIFIED BY 'password';GRANT CREATE, ALTER, DROP, INSERT, UPDATE, DELETE, SELECT, REFERENCES, RELOAD on *.* TO 'username'@'remote_server_ip' WITH GRANT OPTION;FLUSH PRIVILEGES;
- Create a config.py in the home directory and include the below lines
- #Database variables
- DBNAME = "DATABASENAME"
- DBUSER = "USERNAME"
- DBPASSWD = "USERPASSWORD"
- DBHOST = "HOST_NAME or HOST_IP_ADDRESS"
- For testing on the actual OT2! In
ot2_driver_pkg/protocol_handler/protocol_parser.pyin the functionprotocol_parser(...)the commented linenew_file.write("import error_handling\n")needs to be uncommented - Note this step no longer needs to be done. In
ot2_driver_pkg/protocol_handler/protocol_transfer.pyin the functiontransfer(...)thehost_ipanduserneed to be changed to match the database you have - Protocols need to be added to the
/datafolder, to change this inot2_driver_pkg/protocol_handler/protocol_transfer.pyin the functiontransfer(...)the linescp.put(local_path, recursive=True, remote_path='/tmp')the remote path/tmpneeds to be changed to/data. You also need to change inot2_driver_pkg/protocol_handler/protocol_handling_client.pyin the functionhandler(...)the linemsg_error, msg_output, msg_errorcode = send_message_to_OT2("python3 "+ "/tmp/" + protocol.split("/")[-1])the/tmp/needs to be changed to/data
Workcell Manager
source ~/ot2_ws/install/setup.bashros2 run ot2_workcell_manager master
Arm
source ~/ot2_ws/install/setup.bashros2 launch arm_controller arm_bringup.launch.py
Opentrons OT-2 bob
source ~/ot2_ws/install/setup.bashros2 launch ot2_controller ot2_bob_bringup.launch.py
Opentrons OT-2 alex
source ~/ot2_ws/install/setup.bashros2 launch ot2_controller ot2_alex_bringup.launch.py
Scheduler Manager
source ~/ot2_ws/install/setup.bashros2 run scheduler_controller scheduler_manager
Scheduler Work Adder
source ~/ot2_ws/install/setup.bashros2 run scheduler_controller scheduler_work_adder
OT2 Client
This is for each OT2 that you plan on recieving jobs on and must be run on the OT2.
ssh -i ot2_ssh_key root@10.140.54.14cdpython3 OT2_listener.py
Note: Create a new ssh key for each OT2 and use their IP addresses.
Known OT2 IP addresses: 10.140.54.14 | 10.140.54.15
If you would like to run the OT2_listener.py in your local for testing purposes only
source ~/ot2_ws/install/setup.bashpython3 ~/ot2_ws/src/ot2_workcell/ot2_driver_pkg/zeroMQ_OT2/OT2_listener.py
TODO: Write a bashrc script in each of the OT2s and RPIs to automatically launch the listeners when they are powered on.
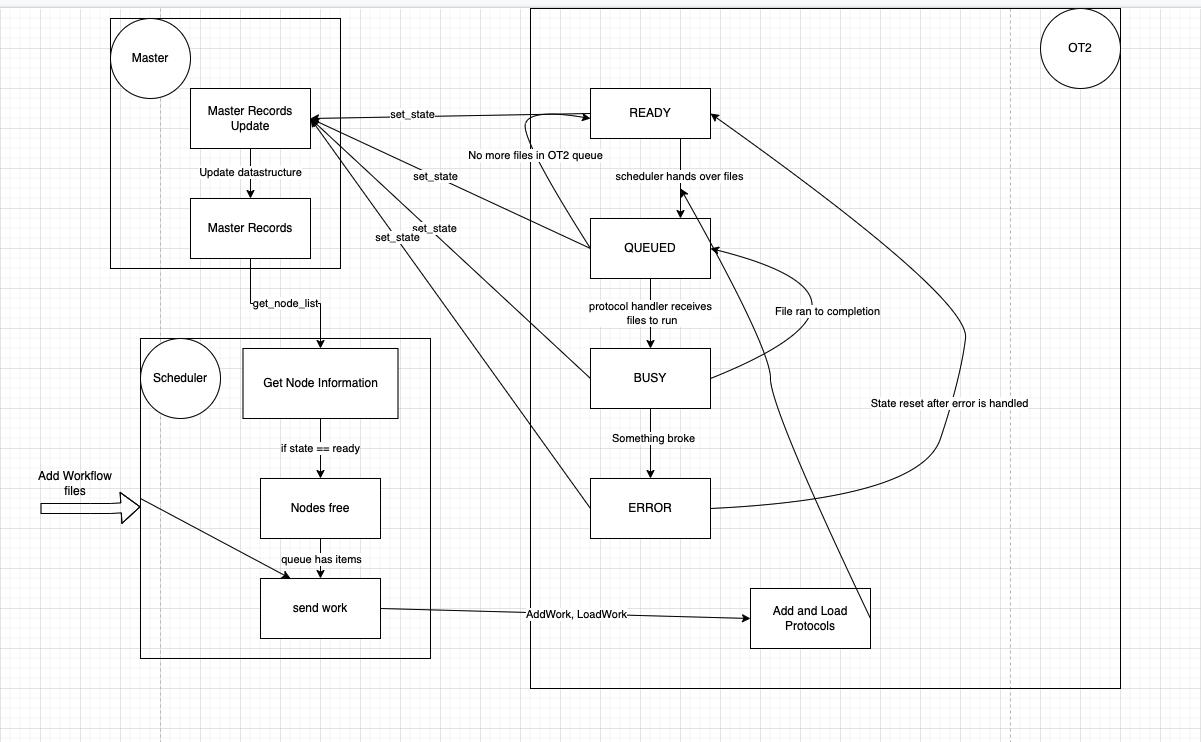
This will cause nodes to be registered with master and you can insert workflow files via the Scheduler Work Adder which will prompt you for workflow files. It will automatically schedule
that workflow to available OT2s.
source ~/ot2_ws/install/setup.bashpython3 ~/ot2_ws/src/ot2_workcell/scheduler_client/scheduler_client/test_bench.py
This will run all of the deadlock detection tests.
source ~/ot2_ws/install/setup.bashros2 run scheduler_client json_scheduler_reader
This will read the workflow.json file in the OT2_modules directory and print it to the screen
Workflow files are json files and must be formatted as such. The first section is the blocks section. You specify a list of blocks each block has the following information,
block-name, the unique name of the block, the scheduler showed throw an error if there are duplicate namestasks, a string with all the different task that need to be run separated by spacesdependencies, a string with all the dependencies off that block that are separated by spaces
Format
'blocks': [ 	{'block-name':'[Your Block Name]', 'tasks':'[protocol1 protocol2 protocol3 ...]', 'dependencies':'[block_name_1 block_name_2 ...]'},
		{'block-name':'[Your Block Name]', 'tasks':'[protocol1 protocol2 protocol3 ...]', 'dependencies':'[block_name_1 block_name_2 ...]'},
		{'block-name':'[Your Block Name]', 'tasks':'[protocol1 protocol2 protocol3 ...]', 'dependencies':'[block_name_1 block_name_2 ...]'},
		{...}
	   ]
After the blocks section you have the meta-data (dictionary) section which contains
author, the creator of the workflow fileemail, the email of the creatordescription, describes what the workflow file does
Format
"meta-data": {
		"author": "[Author Name]",
		"email": "[Author Email]",
		"description": "[Description of the Workflow File]"
	     }
Example workflow file is in the OT2_Modules/workflow.json.
colcon graph --dot | dot -Tpng -o deps.pngGenerates a dependency graph image for the packages